Converting 3.5 to 4.0 – VBM Dual Boiler

Disclaimer: The technical statements, support, information and recommendations contained herein are believed to be accurate as of the date hereof, but 1st-line Equipment, LLC does not make representations or warranties, express or implied, as to its accuracy, its completeness, or the results to be obtained. The information is being provided for informational purposes only and is intended for use by persons having adequate skill and expertise regarding the proper selection, use and application of the products and recommendations and at their own risk and discretion. 1st-line Equipment, LLC is not responsible for any injury or damages from such information. Please note that parts are available for purchase from 1st-line Equipment, LLC self service parts portal. These parts do not include any technical support. If you're unfamiliar with the technical aspects of repairing equipment, please contact a professional for proper evaluation. By continuing to read further, you agree to abide by all the terms and conditions on this website. If you disagree, please leave our website.
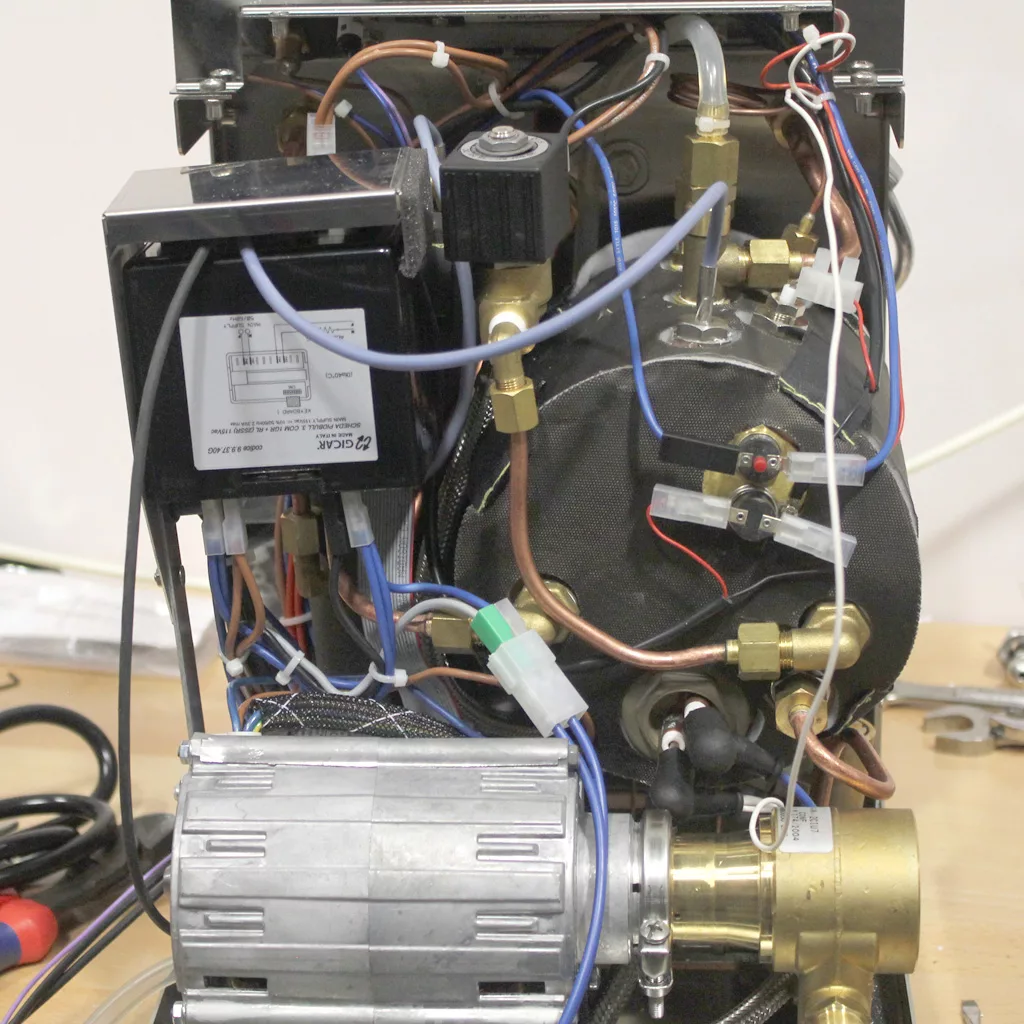
Close-up of a VBM Dual Boiler espresso machine’s internal components with four arrows pointing to labeled parts: 1. blue wire, 2. black solenoid valve, 3. white wire connector, 4. pressure switch with labels and attached wires. © 2025 1st-line.com
  • cut tiewrap #1
  • unplug #2 and #3
  • unscrew #4
Close-up of two cylindrical electrical components with wires attached on a VBM Dual Boiler, one marked by a red arrow labeled 3b. The components are mounted on a metallic surface near copper pipes—part of the 3.5 to 4.0 conversion process. © 2025 1st-line.com
  • unplug #3b and replace with #2
Close-up of a brass pipe fitting with an open end, labeled with a red arrow and the number 5, surrounded by other metal components and black fabric-like material from a VBM Dual Boiler during boiler conversion. © 2025 1st-line.com
  • unscrew #5
A blue-wire temperature sensor for the VBM Dual Boiler, featuring a threaded metal probe (labeled 6) and black connector plug (labeled 7), designed for 3.5 to 4.0 conversion, lying on a metallic surface. © 2025 1st-line.com
A metal rod from a VBM Dual Boiler espresso machine with a threaded section wrapped in white material, labeled “6b” with a red arrow pointing to the threads, and a hexagonal nut below—part of the 3.5 to 4.0 conversion process. © 2025 1st-line.com
  • wrap #6 with teflon tape #6b
Close-up of a VBM Dual Boiler espresso machine component with pipes and wiring, showing a metal fitting labeled with a red arrow and the number 6, attached to a metallic surface surrounded by other connectors. © 2025 1st-line.com
  • screw #6 where #5 was
The inside of a VBM Dual Boiler coffee machine is shown with wires and metal parts visible, highlighting areas relevant to a 3.5 to 4.0 conversion. Red arrows labeled 8, 9, and 10 point to specific screws on a metal bracket inside the machine. © 2025 1st-line.com
  • unscrew #9 and #10 to remove frame #8
Close-up of an electronic device for a VBM Dual Boiler with labeled arrows (11, 12, 13, 14) pointing to various wire connections and terminals on a black box featuring a white wiring diagram label, ideal for 3.5 to 4.0 conversion setups. © 2025 1st-line.com
  • take note of all wires attached to old brain unit
Close-up of an electronic device, possibly part of a VBM Dual Boiler, with several wires connected to numbered ports (16–23), each indicated by red arrows and labels above the connectors. © 2025 1st-line.com
  • take note of all wires attached to old brain unit
A close-up of an electronic component, possibly for a VBM Dual Boiler, with ports labeled 11b–15 in red. A wiring diagram is shown on the black unit atop a wooden surface—ideal for 3.5 to 4.0 conversion setups. © 2025 1st-line.com
  • take note of all wires attached to new brain unit
Close-up of a black electronic connector, possibly for a VBM Dual Boiler, held by hand with red arrows and labels on pins: 16b, 17b, 18b, 19b at the top and 22b at the bottom—perfect for a 3.5 to 4.0 conversion. Some circuit components are visible inside. © 2025 1st-line.com
  • take note of all wires attached to new brain unit
Close-up of a person’s hands holding two black electronic modules, such as those found in a VBM Dual Boiler, connected by wires, with red arrows and labels (11, 11b, 12, 12b) indicating connectors for a 3.5 to 4.0 conversion. © 2025 1st-line.com

new braint unit on top / old brain unit on bottom

  • #11 --> #11b
  • #12 --> #12b
  • #13 --> #13b
  • #14 --> #14b
  • #7 --> #15
Close-up of two black electrical components with labels and wires attached; red arrows labeled 23 and 23b point to each component inside a VBM Dual Boiler, possibly related to a 3.5 to 4.0 conversion process. © 2025 1st-line.com

new brain unit on left / old brain unit on right

  • #23 --> #23b
Close-up of electrical connectors and wires labeled 16b, 17b, 18b, 19b, and 22b on a VBM Dual Boiler espresso machine control box. Red arrows highlight each connection, useful for a 3.5 to 4.0 conversion or repair process. © 2025 1st-line.com
  • take note of all wires attached to new brain unit
A blue wire for VBM Dual Boiler 3.5 to 4.0 conversion, with a white connector on one end and two exposed tips on the other, features red labels marking parts 24 (connector), 25, and 26, displayed on a reflective metallic surface. © 2025 1st-line.com
  • this is part #
  • #25 long end links to #20? gray on the other end
  • #26 short end link to #21? blue on the other end
Close-up of a gray electrical connector attached to blue and white wires on a VBM Dual Boiler, with a metal motor in the background. Red arrows label points for 3.5 to 4.0 conversion with the numbers 20, 21, and 24. © 2025 1st-line.com
  • #20 gray wire links to #25 long on the other end
  • #21 blue wire link to #26 short on the other end
A black electronic relay with four screw terminals, used in VBM Dual Boiler 3.5 to 4.0 conversion, is placed on a metallic tray. Two wires extend from the relay, highlighted by red numbers (27–33) indicating key components. © 2025 1st-line.com
  • this is part #
  • #27 & #28 long screw side / load 1 & 2
    • #26 --> #27
    • #25 --> #28
  • #29 & #30 short screw side / load 3 & 4
A solid state relay with labeled screw terminals numbered 25 to 33, connected by wires. Two blue wires attach at terminal 25 and 26; red arrows highlight each terminal—perfect for VBM Dual Boiler or espresso machine upgrade projects. © 2025 1st-line.com
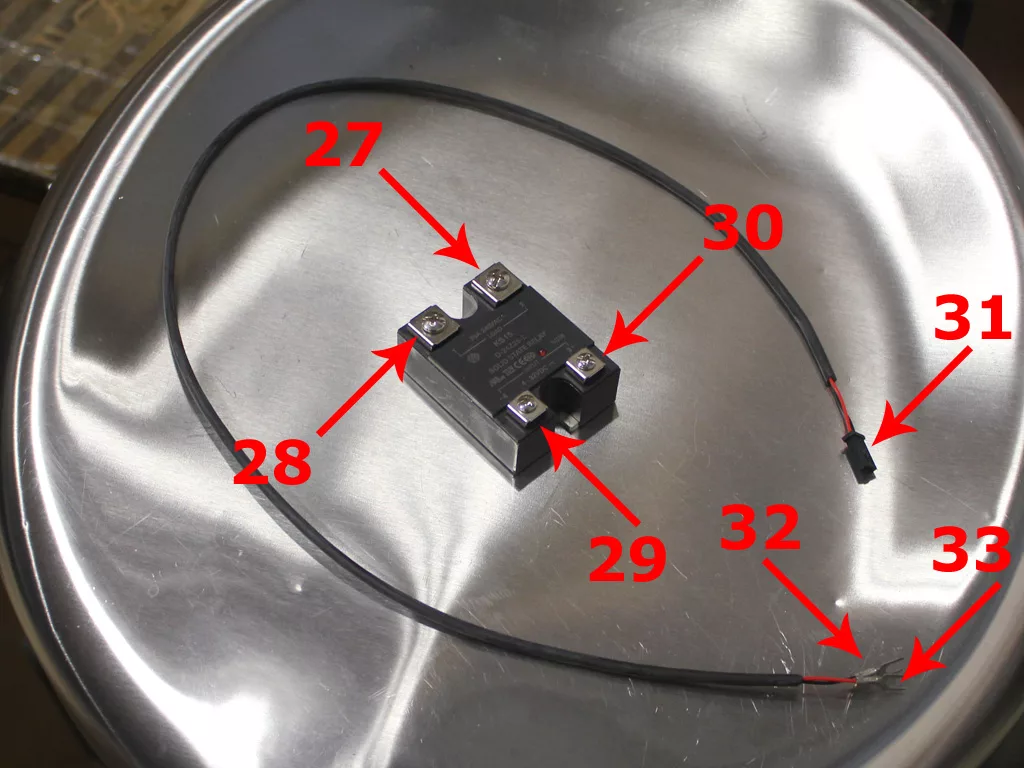
  • #32 black wire screws into load 4
  • #33 red wire screws into load 3
Close-up of an intricate VBM Dual Boiler machine with various colored wires, metal components, and a motor. Red arrows labeled 34 and 35 point to specific parts within the assembly for 3.5 to 4.0 conversion identification. © 2025 1st-line.com
  • #34 is the cover for relay
  • #35 is the frame for the brain unit
Close-up of a VBM Dual Boiler’s internal components with a wooden panel. Red arrows and labels (34a, 34b, 35a, 35b, 36a, 36b) identify screws for the 3.5 to 4.0 conversion. Wires and metal parts are visible behind the panel. © 2025 1st-line.com
  • #34a and #34b hold the cover for the relay
  • #35a and #35b hold the frame for the brain unit
  • #36a and #36b hold the relay – note these 2 won’t be easily removed until you remove the cover #34
A close-up of an open VBM Dual Boiler machine reveals internal wiring, a cylindrical motor, and a metal bracket holding a silver capacitor labeled “35” for 3.5 to 4.0 conversion, with a hand adjusting the bracket and a red arrow pointing at it. © 2025 1st-line.com
  • now you can move the frame #35 to the side and remove the relay cover #34
Close-up of an electrical component from a VBM Dual Boiler, with multiple wires connected. Two red arrows labeled 36d and 36c point to different screw terminals, possibly part of a 3.5 to 4.0 conversion setup on a metal surface. © 2025 1st-line.com
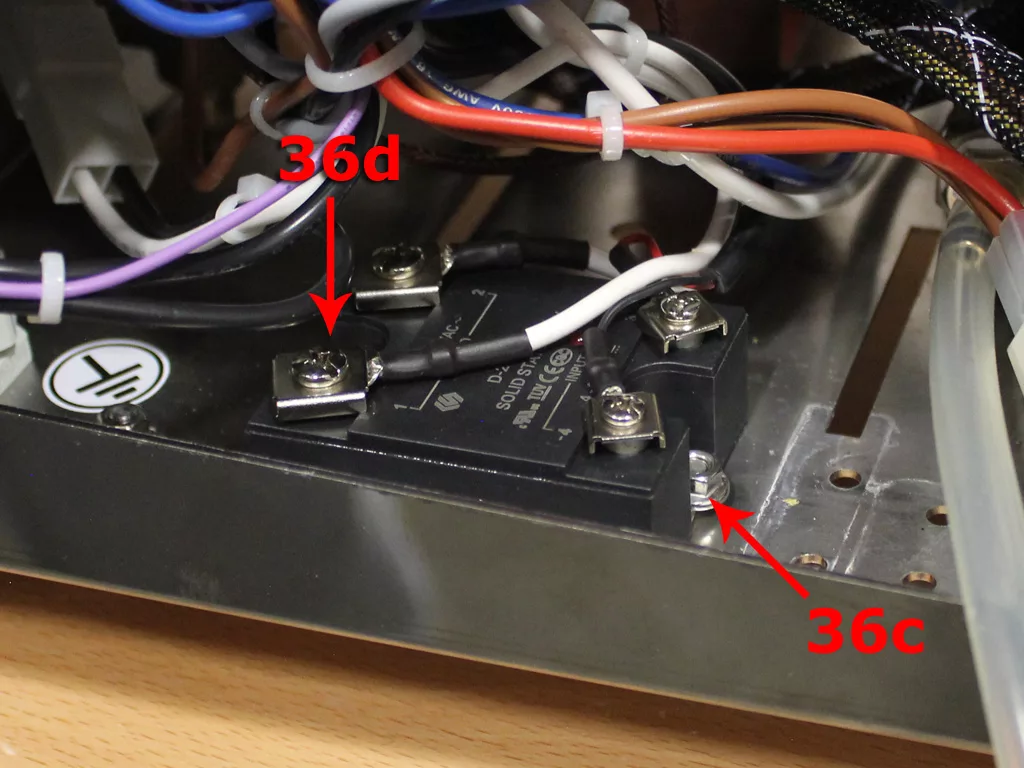
  • now you can hold the nuts #36c and #36d to remove the screws
A hand holds a tape measure stretched across two metal blocks, with red arrows highlighting measurement marks between 1 and 3 inches—ideal for calibrating a VBM Dual Boiler or making a 3.5 to 4.0 conversion. White wires are visible in the background. © 2025 1st-line.com
  • The new relay will be placed next to the old relay. You will need to drill 2 new holes so both relays can be mounted.
  • First put the 2 relays together. Then measure the distance between the openings where the mounting screws go.
Close-up of a metal panel on a VBM Dual Boiler with two red arrows pointing to small holes, a gray lever on the right, black cables below, and a faint reflection of a hand in the background—ideal for converting 3.5 to 4.0. © 2025 1st-line.com
  • The new holes you will drill is located in the circles as indicated in the picture to the right
Close-up of a metal panel on the VBM Dual Boiler with two pairs of small holes, each pair marked by a red arrow. A metal lever is visible on the right side, and several other holes are seen in the background, ideal for 3.5 to 4.0 conversion. © 2025 1st-line.com
  • Measure existing hole for installed relay from a common point, ex right side and top side. Transfer those measurements 1 3/4 inches away from existing holes.
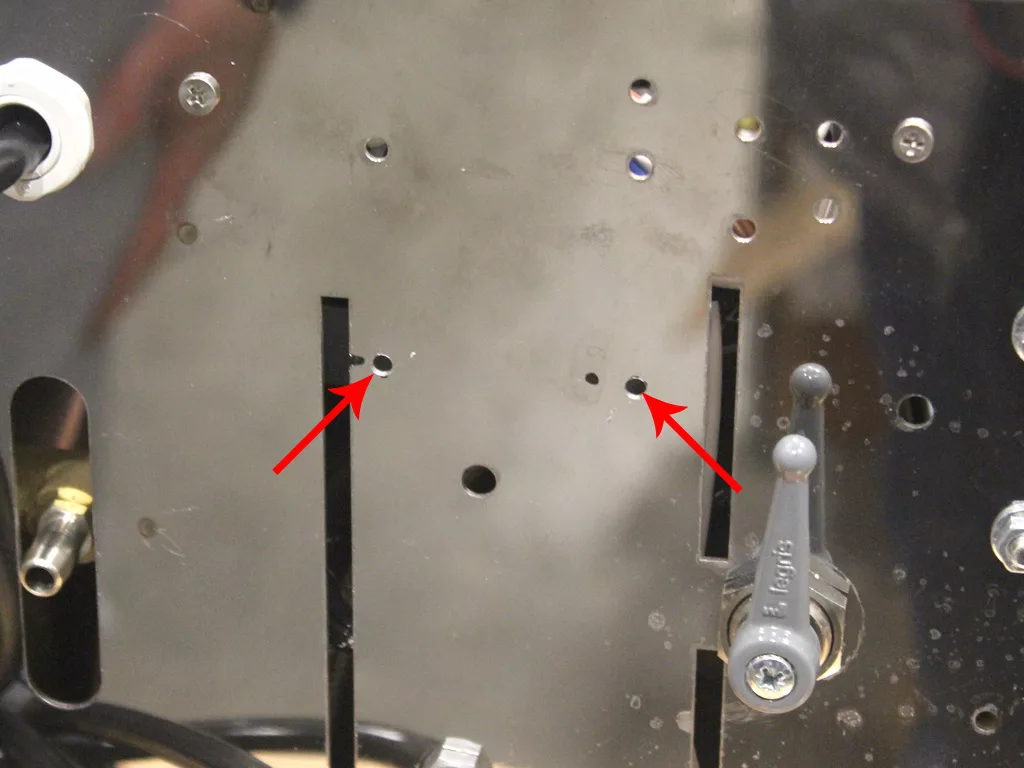
A close-up of a metal panel, compatible with VBM Dual Boiler 3.5 to 4.0 conversion, shows several holes and two red arrows pointing to small round openings. A gray lever marked PUSH is visible on the right side of the image. © 2025 1st-line.com
  • Drill new holes.
  • WARNING: Make sure any parts and wires are cleared on the other side.
A black solid-state relay, part of a VBM upgrade, is mounted on a metallic surface with red, white, and black wires secured to its terminals by screws. Other electronic components and cables are visible in the background. © 2025 1st-line.com
  • In order for the old relay to fit with the new cover, the wires on load 1 and 2 need to be rotated
A close-up of a solid state relay with attached wires, mounted on a metal surface near other electronic components and tubing inside the VBM Dual Boiler. The relay is labeled with specifications, supporting 3.5 to 4.0 conversion, and secured by four screws. © 2025 1st-line.com
  • Here is a picture of the new positioning of the wires on load 1 and 2
Close-up of electronic components and colorful wires inside a metal device, including a black plastic relay, clear tube, and zip ties securing cables—shown during a VBM Dual Boiler 3.5 to 4.0 conversion on a reflective metal surface. © 2025 1st-line.com
  • Place the old relay inside the machine aligning with the new drilled holes.
Close-up view of electrical components and wiring inside a VBM Dual Boiler machine, featuring black relays, blue and brown wires, zip ties, and a wooden base. © 2025 1st-line.com
  • Place the new relay inside the machine next to the old relay.
Close-up of an electrical component with various colored wires, part of a VBM Dual Boiler 3.5 to 4.0 conversion. Red arrows labeled 13b and 31 indicate two specific black wire connectors. A wiring diagram is partially visible. © 2025 1st-line.com
  • Plug #31 into the connection next to #13b
Close-up of a metal enclosure inside an electronic device, with two red arrows pointing at screws or screw holes along the edge. Colorful wires are visible above the enclosure, possibly related to a VBM Dual Boiler or boiler conversion upgrade. © 2025 1st-line.com
  • Place new cover over the relays
  • 2 new holes need to be drilled to mount the new cover in place.
  • Mark the 2 holes as indictated in the picture.
Close-up of a metal panel with electronic components attached, including solid state relays on a VBM Dual Boiler. Two red arrows point to empty screw holes, possibly for additional screws or parts during a 3.5 to 4.0 boiler conversion. © 2025 1st-line.com
  • Drill new holes.
  • WARNING: Make sure any parts and wires are cleared on the other side.
Close-up view of the internal components of a VBM Dual Boiler machine, showing wires, metal parts, and a cylindrical electric motor on a wooden surface. Various cables are organized with zip ties during the 3.5 to 4.0 conversion process. © 2025 1st-line.com
  • Insert the new relay cover in and screw in place.
  • You can also screw back in the brain unit frame.
A hand uses an Allen wrench to adjust a screw on the side of a VBM Dual Boiler espresso machine near the portafilter holder, possibly for a 3.5 to 4.0 conversion. © 2025 1st-line.com
  • Now we need to modify the power switch.
  • Unscrew the switch using an allen key.
A hand holds a black, square-shaped mechanical part with several holes and metal components, likely part of an espresso machine upgrade or VBM Dual Boiler convert 3.5 to 4.0, against a backdrop of wires and machine parts. © 2025 1st-line.com
  • Use a flathead screwdriver to remove the plastic bracket and metal frame
A close-up of a person’s finger pointing at a small electric gearbox motor mounted inside a VBM Dual Boiler machine, with colored wires connected and bundled nearby, possibly after a 3.5 to 4.0 conversion. © 2025 1st-line.com
  • Slide the see through rubber covering up to get access to the wires
A close-up of a person’s hand using a screwdriver to connect electrical wires, including black, purple, and brown, inside a VBM Dual Boiler during a 3.5 to 4.0 conversion, with labeled components and colored wires visible in the device. © 2025 1st-line.com
  • unscrew the connection with the white wires
Close-up of hands wiring electrical components, connecting colored wires to a terminal block inside a VBM Dual Boiler. Various wires and a metal part are visible in the background, illustrating a possible 3.5 to 4.0 conversion process. © 2025 1st-line.com
  • There are 2 white wires: 1 thick, 1 thin. Cut the thin wire.
Close-up view of the inside of a VBM Dual Boiler coffee machine, showing various wires, tubes, copper pipes, a pump, and an electric motor. Some parts are labeled or mounted to a metal frame for 3.5 to 4.0 conversion. © 2025 1st-line.com
  • The white wire you just cut is tie wrapped to other wires. Slide the white wire out from the rest.
A hand holds an electrical component with exposed wiring and terminals, showing black, brown, blue, and red wires connected to screws during a VBM Dual Boiler conversion inside an open electrical device. © 2025 1st-line.com
  • You can now screw back the connection with the thicker white wire.
Close-up of electrical and plumbing components, including copper pipes, wires with connectors, and a brass fitting—likely part of a VBM Dual Boiler’s internal mechanism or a 3.5 to 4.0 conversion process. © 2025 1st-line.com
  • On the heating element of the boiler, you will see a thin white wire similar to the one you cut.
Close-up of a pair of wire cutters gripping a small metal rod, with machinery, VBM Dual Boiler components, and wires visible in the background. © 2025 1st-line.com
  • Remove the wire from the heating element.
  • Cut the terminal on the end.
A close-up of a stripped white electrical wire in front of brass fittings and copper pipes, with other wires and connectors visible in the background—ideal for a VBM Dual Boiler 3.5 to 4.0 conversion project. © 2025 1st-line.com

Strip the white covering to reveal the wire underneath.

Close-up of two exposed white wires beside brass and copper components, likely part of a VBM Dual Boiler machine being repaired or 3.5 to 4.0 conversion, with tools visible in the blurry background. © 2025 1st-line.com
  • Thread the wire from the switch through the heating element cap.
A close-up of a hand holding a piece of white electrical wire with exposed twisted metal strands in front of a brass fitting, commonly seen during a 3.5 to 4.0 conversion on a VBM Dual Boiler espresso machine. © 2025 1st-line.com
  • Twist the 2 wires together.
A close-up of a hand holding two white electrical wires with metal connectors attached, positioned near the brass and copper components of a VBM Dual Boiler during a boiler upgrade. © 2025 1st-line.com
  • Add the terminal to the connected wires.
Close-up view of an electronic component with wires and connectors attached, surrounded by copper pipes and metallic parts—possibly showcasing a VBM Dual Boiler upgrade from 3.5 to 4.0 in industrial equipment. © 2025 1st-line.com
  • Attach the newly constructed wire to the heating element.
A close-up view of VBM Dual Boiler machinery with various wires, pipes, and a metallic component featuring a diagram label. The image highlights parts connected for a 3.5 to 4.0 conversion in electronic and mechanical systems. © 2025 1st-line.com
  • Reinstall the brain unit bracket.
An open VBM Dual Boiler espresso machine reveals internal components, including wires, tubes, a metal motor, brass fittings, a black cylindrical boiler, and various connectors on a wooden surface. © 2025 1st-line.com
  • Contratulations! The machine has now been upgraded. Take note of how the wires are posititoned.

Please note the above information is subject to copyright. It cannot be published by any means without the expressed written consent of 1st-line Equipment, LLC.