Foreword and general instructions
Read carefully the advice in this handbook as it provides important indications regarding safety during installation, use, and maintenance.
Make sure to store this handbook for future reference.
This appliance has to be exclusively for the use it has been designed for: ANY OTHER USE IS TO BE CONSIDERED INAPPROPRIATE AND THEREFORE DANGEROUS.
The manufacturer shall not be considered as responsible for any damages deriving from inappropriate, wrong, and unreasonable use.
Operating any electrical appliances requires some fundamental rules to be carefully observed, i.e.:
- Do not touch the appliance with wet hands or feet
- Do not use the appliance with bare feet
- Do not pull the power cord to unplug the appliance from the socket
- Do not expose the appliance to atmospheric agents
- Children should be supervised to ensure that they do not play with the appliance
- This appliance can be used by children aged 8 years and above and persons with reduced physical, sensory or mental capabilities or lack of experience or knowledge if they have been given supervision or instruction concerning the use of the appliance in a safe way and understand the hazards involved.
- Cleaning and user maintenance shall not be made by children
Before performing any cleaning or maintenance, unplug the appliance, either by removing the plug from the socket or disconnecting the main electrical supply.
In case of failure or malfunction, turn the appliance off and avoid fixing it directly. For any maintenance operations please exclusively address an authorized OBEL SRL technical center requesting exclusively original spare parts to be used.
Failure to comply with what is stated above may result in lower safety levels and loss of warranty coverage. If this appliance will no longer be used, we recommend making it inactive by unplugging the power cord.
Rules for installation, use and cleaning
Before performing any cleaning or maintenance, unplug the appliance, either by removing the plug from the socket or disconnecting the main electrical supply.
Installation must be performed in accordance with the indications provided by the Manufacturer. A wrong installation may lead to damages or injuries to people, animals, and objects, which the Manufacturer shall not be considered as responsible for.
Once the packaging has been removed, please make sure that the appliance is intact. In case of doubt do not use the appliance and address an authorized OBEL SRL technical center.
Packaging parts (plastic bags, foam, nails, etc…) must not be left within children’s reach as they might be hazardous and must be disposed of.
Before plugging in the appliance make sure that its technical features are suitable for the electrical system it is going to be used on. If the socket and the plug (if fitted) are not compatible please have the socket replaced with a suitable one, making sure that the diameter of the cord is suitable to the appliance’s power absorption. In case of cord replacement, it is compulsory to use an H07RN-F-compliant cord.
Make sure that the power supply matches the one the appliance has been designed for and that the existing wiring can bear the absorption of the newly installed appliance, as well as of the existing devices. After installing a circuit breaker with fuses, connect the cord wires of the appliance to the circuit breaker in accordance with the related schematics.
The Manufacturer advises against using adaptors, multiple sockets, and cord extensions. If necessary, use simple or multiple adaptors only and extensions in compliance with the safety laws and regulations, making sure not to exceed power loads, indicated on simple adaptors or cord extensions and the maximum load indicated on multiple adaptors.
The electrical safety of this appliance is guaranteed only if it is properly connected to an earthed socket, as per the most up-to-date electrical safety laws and regulations. Please have this relevant safety feature carefully checked and, in case of doubt, please have qualified personnel check the existing power wiring.
The Manufacturer shall not be considered as responsible for any damages occurring when the appliance is not properly earthed.
To avoid dangerous overheating, we recommend fully unwinding the power cord.
The user must not replace the power cord. If the cord is damaged or has to be replaced, address an authorized OBEL SRL technical service.
Make sure the appliance is unplugged when not in use. Open the circuit breaker the appliance is connected to, when not in use. Do not close or block vents or heat dispersion slits. Keep the appliance away from walls and other objects.
Lorem ipsum dolor sit amet, consectetuer adipiscing elit, sed diam nonummy nibh euismod tincidunt ut laoreet dolore magna aliquam erat volutpat.
CLEANING OF THE APPLIANCE
HOPPER: Close the hopper slide gate, remove the hopper and empty it from the remaining coffee beans. Clean the hopper with a moist soft cloth or with a small amount of water and soap
to eliminate any oily residue.
DOSER: Remove with a brush all the ground coffee from the dosing star. Clean the glass with water and soap.
GRINDING CHAMBER: Close the hopper slide gate, remove it and grind the remaining coffee in the grinding chamber. Remove any remaining coffee beans from the bean hopper. Put the
recommended grinder cleaning product into the bean hopper, put the hopper in its place, and open the slide gate in order to allow the product to enter the grinding chamber. Grind all the cleaning product at a medium coarse grind setting until nothing remains in the grinding chamber. Clean the hopper and refill it with coffee beans. Discard the first 2-3 doses of coffee to ensure no residual clearing product remains in the grinding chamber.
EXTERNAL BODY: Wipe with a dry or slightly damp soft cloth.
DO NOT SUBMERGE THE GRINDER IN WATER OR USE POWER WASHING DEVICES
DO NOT CLEAN THE APPLIANCE WITH A WATER JET.
ENVIRONMENTAL CONDITIONS FOR AN APPROPRIATE APPLIANCE USE
- Room temperature: 5 – 45° C
- Maximum humidity: 80% relative humidity
For correct functioning please carefully follow the instructions provided, and having qualified personnel perform a regular operation and safety check.
Do not use the device without coffee. Do not leave the appliance where the temperature goes below zero.
NOTICE: The label bearing the serial number and the technical features of the unit is pasted under the appliance.
INSTALLATION
THE APPLIANCE HAS TO BE INSTALLED BY QUALIFIED PERSONNEL IN ACCORDANCE WITH THE INSTRUCTIONS HERE BELOW:
- Make sure that the power supply is adequate to the appliance’s power rating and voltage;
- Make sure that the socket is properly earthed;
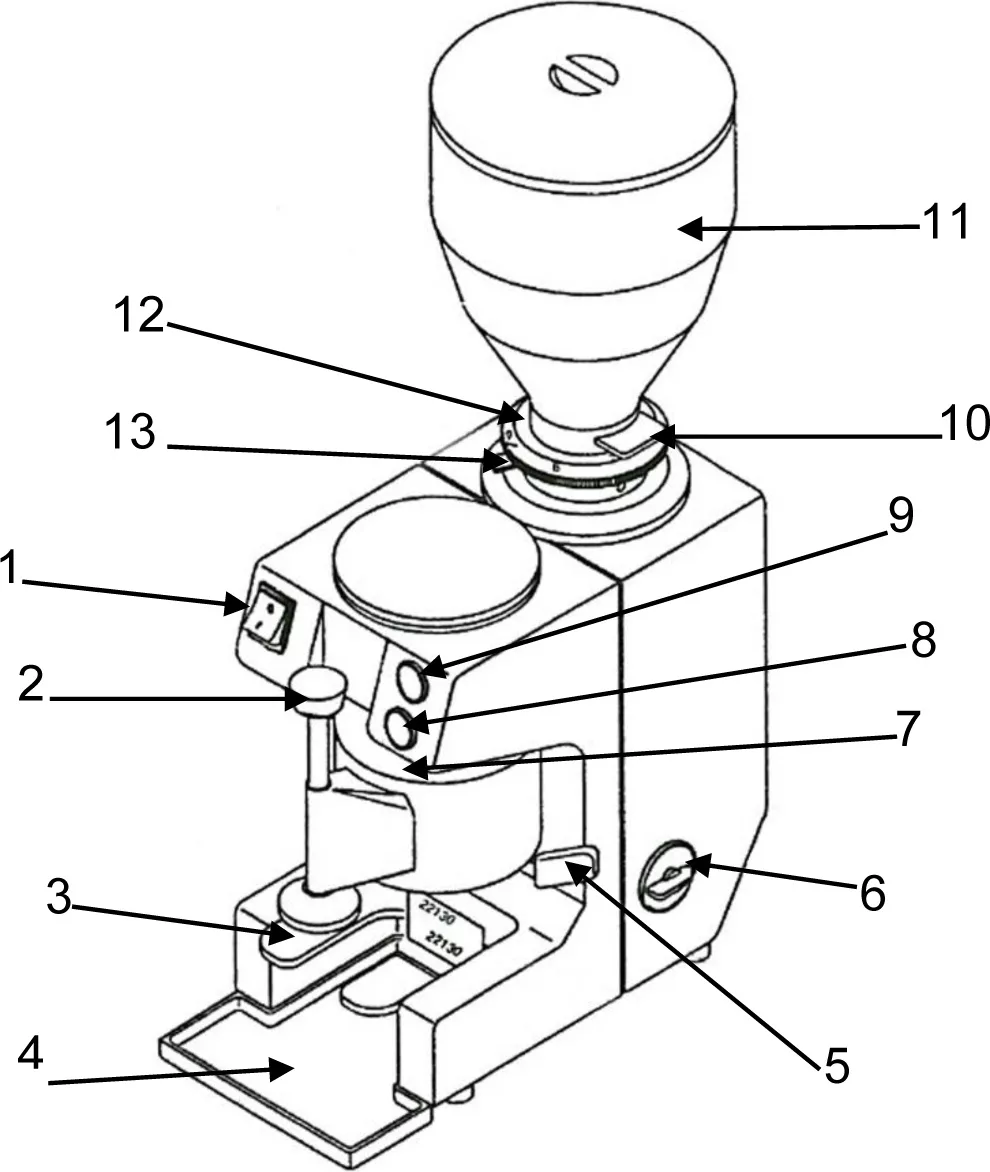
- Insert the beans hopper (11) into the adjusting gear and lock it with the screws (supplied);
- Make sure that the light switch is off (0) and that the plug is properly inserted into the socket.
COMMISSIONING
Model EB BASE – EB TIMER
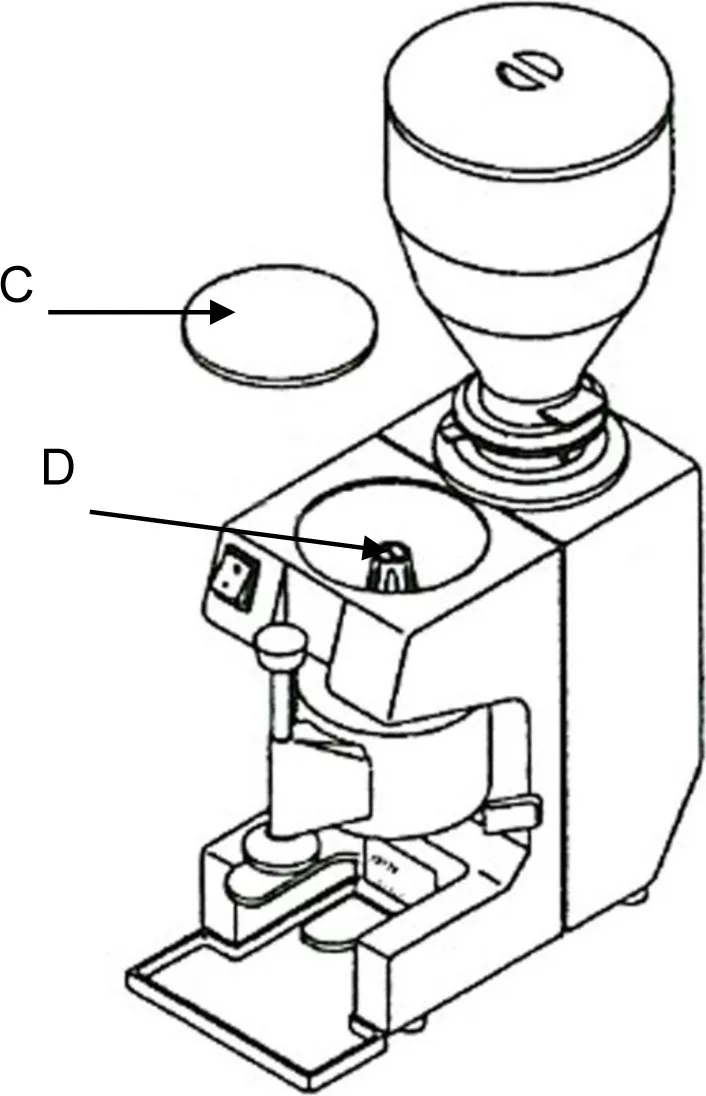
- Remove the hopper cover ( A ), put the coffee beans into the hopper (K), and open the slide gate ( I ).
- Push the main switch ( H ) on the I position, or act on the timer (T) to turn the unit on.
- Push on the blocking pin ( B ) and turn clockwise the adjusting grid ( C ) to get the burrs closer and obtain a thin grinding. Turn anti-clockwise the adjusting grid ( D ) to move the burrs further apart for coarser grinding.
Model EB AT
- Remove the hopper cover ( A ), put the coffee beans into the hopper (K), and open the slide gate ( I ).
- Push the main switch ( H ) on the I position and then the (G) button to turn the unit on. It will automatically stop when the ground coffee hopper will be full. After 6 doses (6 shots) the grinding will automatically start until the ground coffee hopper is full again. To stop the grinding at any time push the (L) button.
- Push on the blocking pin ( B ) and turn clockwise the adjusting grid ( C ) to get the burrs closer and obtain a thin grinding. Turn anti-clockwise the adjusting grid ( D ) to move the burrs further apart for coarser grinding.
Model EB AT 1 micro
- Remove the hopper cover ( A ), put the coffee beans into the hopper (K), and open the slide gate ( I ).
- Push the main switch ( H ) on the I position and it will light on to confirm the unit is working.
- The units will stop grinding when the fixed level is reached (built-in level gauge). The grinding will automatically restart when the quantity of ground coffee inside the doser will reach the lower fixed level.
- Push on the blocking pin ( B ) and turn clockwise the adjusting grid ( C ) to get the burrs closer and obtain a thin grinding. Turn anti-clockwise the adjusting grid ( D ) to move the burrs further apart for coarser grinding.
WARNING For all the models:
- The coffee grinder is equipped with a dose counter (E).
- The coffee grinder is equipped with a safety device preventing the motor from overheating. Should the safety device be set in, wait for the system to cool down and make sure that overheating is not caused by external sources.
- Grinding grade adjustment is to be performed while burrs are running.
GROUND COFFEE ADJUSTING:
MAINTENANCE
Clean the hopper on a weekly basis. The only parts to be replaced are burrs: check if they wore out and replace both at the same time as described here below.
WARNING:
- Before performing any maintenance operation, make sure that the coffee grinder is unplugged.
- Always replace both burrs.
Burrs replacement:
- Set in the hopper closure
- Activate the grinder until no more powder will be dispensed
- Turn off and unplug the grinder
- Remove the hopper by unscrewing it
- Press down the docking rod with one hand and with the other unscrew the burrs housing gear by turning it anti-clockwise
- Unscrew the 3 burrs docking screws then remove the burrs; make sure to remove any trace of coffee powder from the burrs housing
- Place and lock a new set of burrs in the housing
- Screw the adjustment gear on the grinder’s body until the burrs touch
- Unscrew the adjustment gear by 5 – 10 steps
- Insert and lock the beans hopper
- Plug in the grinder and turn it on
- Open the hopper closure and set up the grinding grade while the grinder is running
TROUBLESHOOTING
| Problem |
Cause |
Solution |
| The coffee grinder does not turn on |
- The plug is not in the socket
- The faulty electronic control unit
|
- Check that the plug is inserted into the power socket. Inspect the electric cable.
- Contact the technical assistance service
|
| The motor does not run |
- Foreign bodies between the burrs
- Overheating
- Broken capacitor
|
- Unplug the coffee grinder and unscrew the adjusting screw to remove the foreign body.
- Wait for the grinder to cool down.
- Contact the technical assistance service
|
| Coffee powder mixed in with larger fragments |
- Worn burrs
- Not perfectly flat burrs
|
|
We recommend following the time intervals below for the burrs replacement:
| 1 Kg of coffee per day |
Replacement once a year |
| 2 – 3 Kgs of coffee per day |
Replacement every 6-7 months |
| 4 – 6 Kgs of coffee per day |
Replacement every 3-4 months |